Monday, February 3, 2020

Delete Temporary Files And Improve OS Speed......!


Now a days we are using windows 10 operating system in many of laptops as well in computers. Some times we getting low speed performance. In this situation how we can make speed up.........? The answer is yes why not ….? We can improve operating speed and response of windows 10 or other windows operating systems as well. 


Let start what we need to do so we can up speed and enjoy work through windows 10. I will explain step by step execution procedure so you can easy make your system faster.


What is temp files ? How its creating automatically in windows operating system ?

If you are working on any application at that time operating system automatically generated file and that all files going to store on above location that is in  C:\Windows\TempThese file get stored but user don't no about that whatever he is going to work on any application and execute many task at a same time from that application like notepad at this time temporary file get created with (.doc) extensions. In windows operating system. If you install new particular application in system at the same time installation log files created automatically and stored in temp folder. As well if windows operating system gets updated and some error files messages, files encountered these all files also stored at same place. 


Why temp files need to delete ? What is the impact of that files on operating system.....?

1. Allocating unwanted space in hard drive.

    Temporary files getting stored in C:\Windows\Temp. These files no longer use for a operating system as well to user also. When a user gets cleaned theses files recent times for example in a week or one time within fifteen days. That will keep system cleaned from temporary files. As well unwanted hard drive space also not get occupy.

2. Windows operating system get speed up.

   Once you delete all the temp files.....?  Yes, windows get speed automatically increased that you experience working on same windows operating system. It will give fast speed and operating response to user. Hard drive memory allocation will get free. 

 
How to delete temporary files from computer operating system? 

So let get start to delete temporary files from computer. Will tell step by step procedure follow that step and make your windows system faster and enjoy working with them.

Delete Temporary Files from computer system.


Press windows key and R at a same time from your system keyboard. As shown is below image.


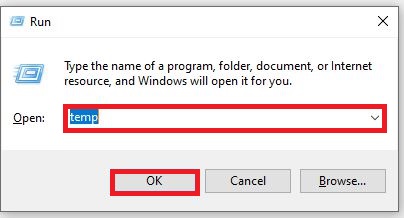
Once you press both the keys at a same time below Run prompt will open.  


Write temp and click on OK button.


All temporary file will opened which is already stored in system location - C:\Windows\Temp You will see all the related files which has created temporarily these files are not usable for our system. Its only occupying memory from system C drive.


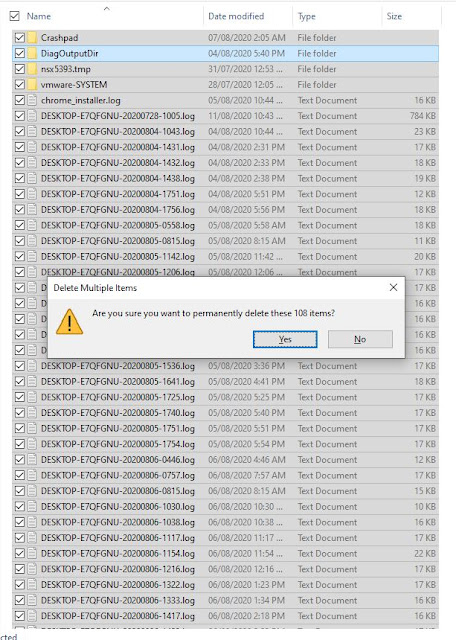
Select all the files (Press Ctrl+A button from keyboard).


Now hit Delete key from your computer keyboard. Below popup message will appear and click on Yes. 


Now all the temporary files get deleted from your computer operating system. You can enjoy with your computer work and take quick process response from your computer.


Another way to clean temporary files in windows operating system.

In above article we are deleted temporary files from C:\Windows\Temp


Sunday, March 3, 2019

PDF File Not Opening In Windows 10

If you have any PDF file and want to open it for that Adobe reader software should install in your system this is first and important requirement. If you don't have then download it from Google and install it in your computer system. We are receiving many documentary file in format of PDF. Many times we are facing this below error. That pdf file is not opening and all. So I will explain here why we are getting this problem.


When you trying to open any pdf file that time you are getting this error. This error happens may your Adobe reader is not latest version or its not updated.


If this error occurred when you are trying to open Pdf file document then you try below solution on that error.

Solution 1: Click on Edit ---->Preferences 


Now click on Security (Enhanced) 


Once click on Security (Enhanced) Below screen will appear on your screen you need to just uncheck box Enable Enhanced Security. Check below screen for this change.


Now click on OK and close this all window and open .pdf file. Which file you not able to open.

Solution 2: 
                     

Saturday, February 23, 2019

Gray Scale Mode In Windows 10

How to Unable And Disable Gray Scale Mode

sometimes you are working on your computer system and by mistake you are pressed keys in hurry that time this gray screen you are seen many times. If this type of display you look like then don't worry it is a one small setting that you have to change it. Then you can you can see your display as earlier. You can see like below display is look like.  


In this tutorial I will explain you with two ways that gray scale display how to Enable and Disable.

Solution : 1
Step-1 : You can press directly keyboards buttons ( Windows + Ctrl+C )

Step 2 : Once press all this 3 keys at a time and see the change now gray scale display it will automatically disable and your system look like as earlier in color. like below screen.


If above solution will not work then you can try with this solution no-2. This will also help you. so lets we will start.

Solution 2


Step 1 : Right click on your desktop anywhere and click on personalize like shown in below image.


Step 2 : Now click on High contrast setting.


Step 3 : change setting on to off


Step 4: Shown in below image 


Step 5 : Now it will seen like your earlier color display as shown in the below image.


Sunday, January 27, 2019

Sticky Notes

 Sticky Notes 


    In earlier era writing notes that was more difficult task in front of computer user. Microsoft has think user side perspective and Sticky notes comes in picture. Windows 10 provided sticky notes bi-default small application to user so he can write his notes on sticky notes. 


 How to start sticky notes

          click on Search left side corner next to windows start menu           and search for sticky notes. 


If you are writing notes always then you can ping sticky notes to task bar. It will need not to go search and write sticky notes you can easily open it from task bar in only single mouse left click.


                     how to open new Sticky Notes window 

If you want to open new sticky notes so need to click previous sticky notes left side corner (+) sign so now you will open new sticky notes window.


                                           For reference below shown in image


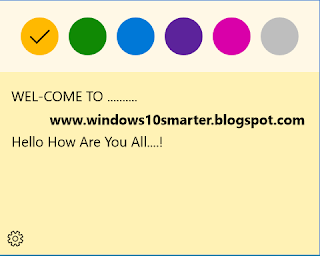
we can change color of sticky notes like shown below image you can change color on your choice which is available in panel.


                                   you can select color from below colors


After color changed sticky notes showing like below image 


       Sticky Notes backup from one windows 10         system to other.  

      Many times we are write our small notes but that notes were very important. I will show you how take backup of that sticky notes. So for that both computer system should have same windows 10 operating system.

    Sticky notes file located in windows exact path is 

 C:\Local\Packages\Microsoft.MicrosoftStickyNotes_8wekyb3d8bbwe\LocalState\plum.sqlite

This is the path and plum.sqlite is more important sticky notes file. Now you need to copy this plum.sqlite and paste on same location in other system where you want and restart once your system and open Sticky notes that will open your sticky notes that you want backup of that.


Tuesday, December 18, 2018

Comparison Windows 8.1 Vs Windows 10

About Windows 8.1 

 This operating system developed by Microsoft. It is closed source OS. Microsoft released its manufacturing version on 27 August 2013. After 2 months it was released for general purpose on 17 October 2013. Official website www.microsoft.com 

    It is faster version from previous operating system like windows XP and windows 7. Its graphical user interface also too good. Than previous operating systems. Windows 8 includes tablet mode using this feature user can change previous tab as currently working tab easily (By pressing Alt+Tab key from the keyboard).


Saturday, December 15, 2018

Windows 10 Operating System Overview


Hello technical buddies. Hope you are all doing well ! Today I am coming with windows 10 smarter new blog. We always facing difficulties to operate a new system like Desktops and Laptops right? Now in this blog, I will explain you how to resolve an issue while operating Windows 10 operating system. Microsoft has provided user friendly graphical user interface and other feature as well. Microsoft has invented more functionality for user to operate it easily like Cortana talk assistant, Edge browser on Multiple windows.This tutorial will help you to learn basics and how to operate this system and it's features.


Computer System Requirements For Windows 10


         If you are going to update windows 10 in your system then below basic requirement should fulfill as fallow.


                             1. Processor - 1 Gigahertz (GHz).

                             2. RAM - 1 gigabyte (GB) for 32-bit or 2 GB for 64-bit.
     
                             3. Hard Drive - 16 GB for 32-bit OS 32 GB for 64-bit OS.

                             4. Graphics Card - Direct X 9 graphics device with WDDM drive.

                             5. Windows Update - Keep internet connected for live updates.


Windows 10 Operating System Installation 


           Still we are used windows operating system like Windows 7, 8.1 etc. So now time to upgrade               new version Windows 10. Microsoft always inventing new version so that user can access                   product very easily.

So let start to installation windows 10 in system. Before you are going to installation take data back up on One Drive that provide cloud space for user to user can upload his data on one-drive take back up whenever he want.

Step 1 : Download Windows 10 and its product licences key.  
Download Windows 10 genuine and its licence product key from  https://www.microsoft.com/en-in/software-download/windows10. After completion windows 10 download.
1  Launch media creation tool.
2  Then accept terms and conditions regarding license agreement
3  Now need to create Windows 10 installation media like (Pen-drive,DVD,External Hard-Disk)      for other system.

Step 2 : Boot USB device (booted operating system)
1. first connect USB drive (External Hard-drive, Pen drive).
2. Pendrive need to minimum size 4 GB for the 32-bit OS and 8 GB for the 64-bit OS.
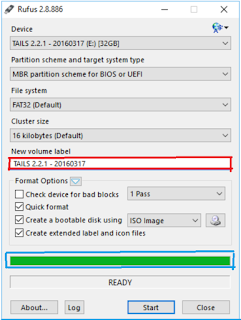
3. Use RUFUS software for boot external drive so download from https://rufus.ie/en_IE.html
4. Run rufus software. and select bootable disk select ISO image of Windows 10. 


Step 3 : Configuration of correct boot order
Now Its more important to setup correct boot sequence so we can install successfully windows 10 in your system. now you want to open operating in bootable device so its important to set up a boot order.we need to change it from BIOS (Basic Input Output System). This will appears when you are pressing key at system booting like (F1,F2,F3,F8,F10,F12,ESC,Delete). Its depends upon your system manufacturer like DELL, Hp, Lenovo etc. You have to check it on manufacturer official website.

If once enter in the BIOS settings find there boot option and select your boot device name as a primary. In image my bootable device name is Seagate BUP Slim BK 0304 so I have selected in Boot Option #1.


once you done this setting click on Right arrow of keyboard
select Save & Exit then click on Yes. like in this below image.


If your bootable device not connected properly then blow error system will throw.


Connect device properly and press Ctrl+Alt+Del then system will restart.